
Updated on 18 September 2026
Dispatcher module user manual
Guide to using the Dispatcher module, from logging in to changing your password.
Logging in
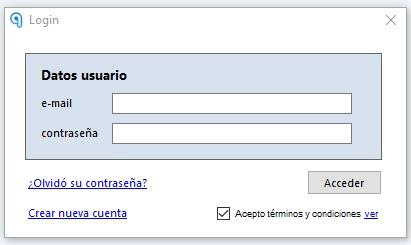
When you run the program, you will be asked for your user, which is the e-mail address provided during registration, and the password provided by the installer and/or trainer.
Changing your password
If you forget your password, you can click the "¿Olvidó su contraseña?" (Forgot your password?) option to receive a new password by e-mail.
To change your password, follow these steps:
- Go to Inicio (Home) > Administración de la cuenta (Account administration). (If it does not open, you can access it from here)
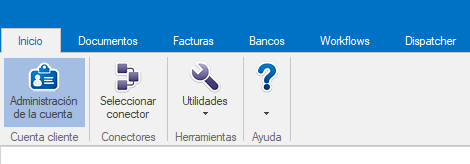
- Select the "Mis datos" (My details) option and click "Cambiar contraseña" (Change password).
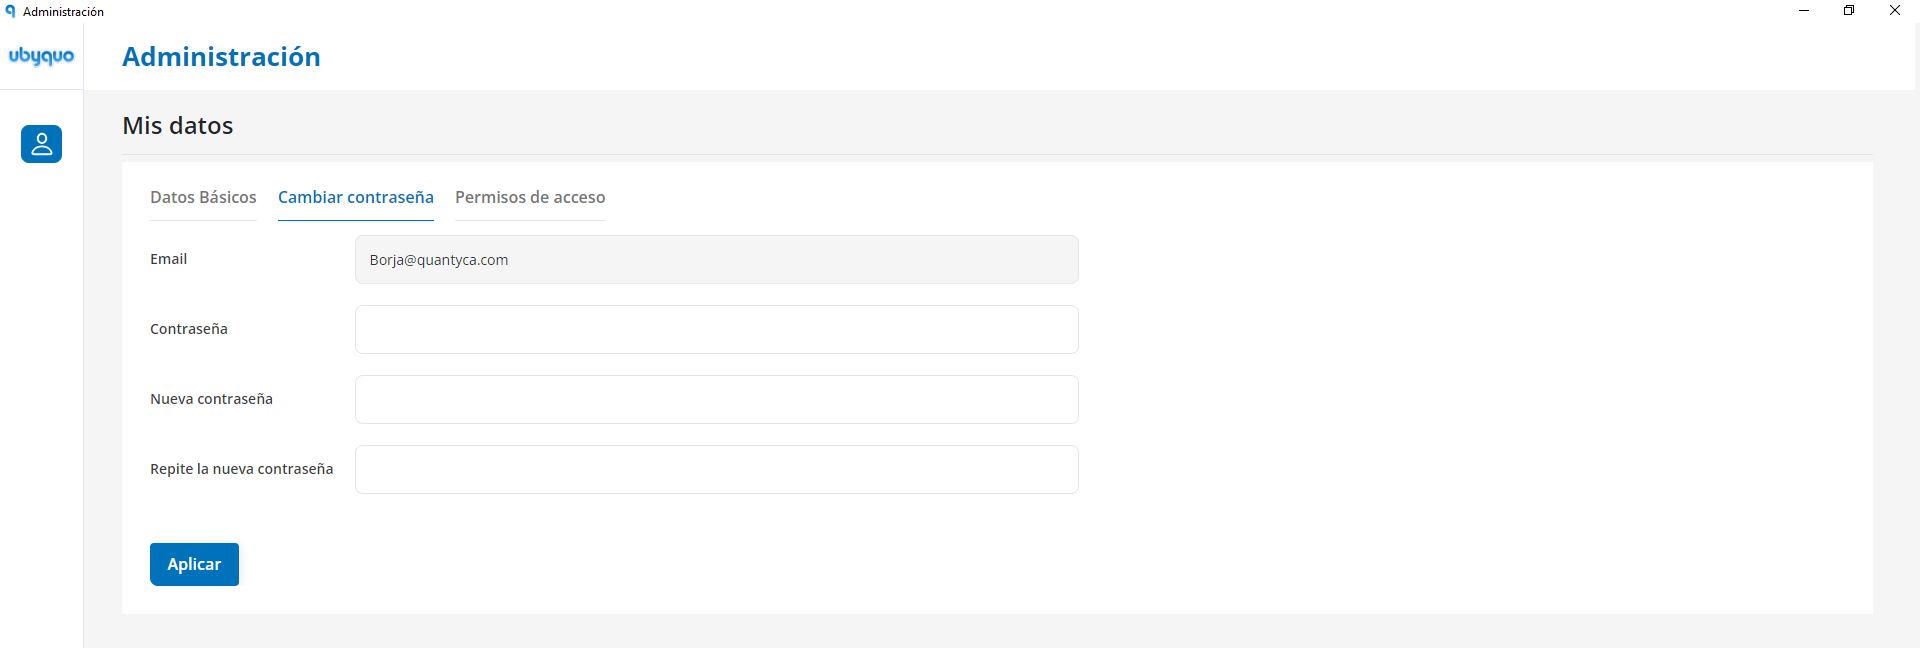
- The new password must be:
- — Alphanumeric
- — At least 8 characters
- — Include uppercase and lowercase letters
We recommend updating your password regularly for security reasons.
Accessing the Help Center

To get familiar with the options of the documents module, open the Help Center from the module icon .
There you will find detailed articles and guides that will help you resolve common questions and get the most out of the tool.
- Opens the module's configuration options.
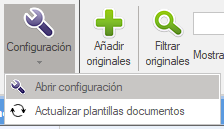
- Actualizar plantilla de documentos (Update document template): Downloads new original document templates.
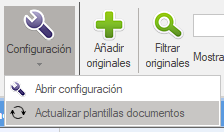
- Añadir originales (Add originals): Opens a Windows window to browse for and add original documents.
- Filtrar originales (Filter originals): Opens the advanced filter window.
Original document filter options:
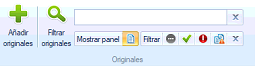
- Filter by text.
- Show or hide the original documents window.
- Show or hide originals pending processing.
- Show or hide originals processed successfully.
- Show or hide originals processed with errors.
- Show or hide duplicate originals.
Filter documents:
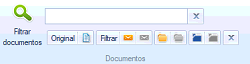
- Filter by text.
- Show or hide different types of documents according to status and destination.
- Shows or hides documents sent by e-mail.
- Shows or hides documents not sent by e-mail.
- Shows or hides documents saved to the folder.
- Shows or hides documents not saved to the folder.
- Shows or hides documents sent to your department in the Documents module.
- Shows or hides documents not sent to your department in the Documents module.

Opens the Excel file with the information for sending documents:
- Identification of companies and employees (CIF – Name)
- Recipients' e-mails (department managers and employees)
- Sending profile (optional)
FiscalLaboral sheet: Contains the companies' data.
IMPORTANT: The company name that appears next to the CIF is the one that will be used throughout the module.
Trabajadores sheet: Contains the employees' data and is used when we choose the Enviar a trabajador (Send to employee) option.
Sending documents
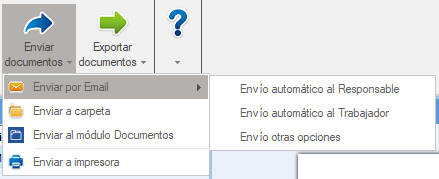
Lets you send recognized documents to different destinations (e-mail, folders, Documents module, printer).
- Envío automático al Responsable (Automatic sending to the Manager): Sends an e-mail to the recipients listed for the company in the FiscalLaboral sheet.
- Envío automático al Trabajador (Automatic sending to the Employee): When the document has an employee (payslips, withholding certificates…), it sends it by e-mail to the address listed in the Trabajadores sheet.
- Envío otras opciones (Other sending options): We choose the Perfil de envío (Sending profile) and Destinatario (Recipient) ourselves.
Sending profile options
- Enviar con perfil automático (Send with automatic profile): Default e-mail.
- Enviar con este perfil (Send with this profile): Choose from the available e-mails.
Recipient options
- Enviar a destinatarios (Send to recipients): To the e-mail that corresponds to the document.
- Enviar a trabajadores (Send to employees): Specific to payslips, sent to the document holder.
- Enviar con gestor correo (Send with mail client): Opens the default mail client on your computer.
- Enviar a Carpeta (Send to Folder): Sends the selected documents to the folder that was configured when the Dispatcher module was first started.
- Enviar al Módulo Documentos (Send to Documents Module): Sends the selected documents to the corresponding department in the Documents module.
- Enviar a Impresora (Send to Printer): Prints the selected documents.
Export documents
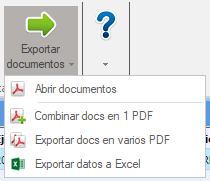
Lets you export information from Dispatcher, such as selected documents as PDF or data to Excel.
- Opens the selected documents as PDF.
- Merges and saves the selected documents into a single PDF.
- Exports by saving the selected documents as PDF.
- Exports the data of the selected documents to Excel.
Main form
The main form of Ubyquo's Dispatcher module is the interface from which users can manage the documents that will be processed, classified and sent. This interface is made up of several key areas:
In the upper left of the form there are two fundamental sections for filtering and organizing documents:
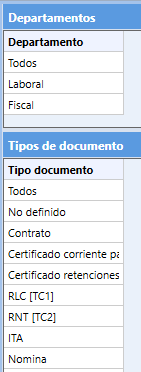
- Departamentos (Departments): This list shows the different company departments configured to work with the Dispatcher module. When you select a department, the system filters the documents associated with that area (for example, Labor, Tax, Accounting, etc.).
- Tipos de Documento (Document types): This shows all the document types that Dispatcher can automatically recognize and classify (for example, payslips, contracts, certificates, tax forms, etc.).
These sections allow quick, focused navigation within the workflow.
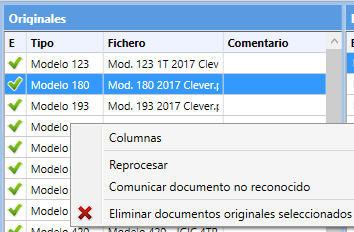
This window shows the original documents that have been added to the system but have not yet been fully processed or classified as official documents.
The available features are:
- Columnas (Columns): Lets you show or hide certain columns with information related to the original files. Useful for customizing the view to the user's needs.
- Reprocesar (Reprocess): Reprocesses the selected files again. This option is useful if the Dispatcher configuration has been updated or if there were errors in the previous recognition.
- Comunicar documento no reconocido (Report unrecognized document): Automatically sends an e-mail to Quantyca reporting that the file could not be recognized by the system.
It includes the file itself as an attachment to make the analysis easier for technical support. - Eliminar documentos originales seleccionados (Delete selected original documents): Removes the files selected in this window from the system. This action is irreversible, so use it with caution.
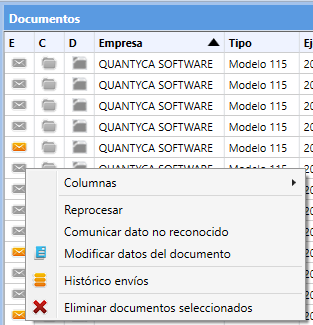
Once the original files have been processed, the recognized and validated documents are moved to this window.
The features available in this section are:
- Columnas (Columns): Lets you customize which columns are shown or hidden so you can view the document data more clearly.
- Reprocesar (Reprocess): Runs the processing again on the selected documents. This action is useful for reclassifying documents after configuration adjustments or manual corrections.
- Comunicar dato no reconocido (Report unrecognized data): If the system has not recognized a field in the document (for example, the NIF, company name, document type), you can notify Quantyca.
The e-mail includes the document as an attachment for technical analysis. - Modificar datos del documento (Edit document data): Lets the user manually edit the document's fields (such as date, type, company, etc.) in case of incorrect recognition.
- Histórico de envíos (Sending history): Shows a detailed record of all the items sent from the system:
- — Items sent by e-mail
- — Items sent to folders
- — Items sent to the Documents module (associated with departments such as Labor or Tax)
- Eliminar documentos seleccionados (Delete selected documents): Permanently deletes the selected documents from this window.
On the right side of the form is the Visor (Viewer), which lets you directly view the image of the selected document.
- Integrated viewing:
This is a preview of the document without having to open it in external applications. - Usefulness:
It makes it easier to check the document's content and visually validate the data before sending or making changes.
Working with Dispatcher
Ubyquo's Dispatcher module lets you add documents that will then be classified and sent through the different configured channels (e-mail, folders, Documents module or printers). The methods available to add documents to the system are detailed below:

This option lets you manually select documents from the Windows file system.
- Access: Click the "Añadir originales" (Add originals) option in the ribbon.
- How it works: A Windows File Explorer window will open. From there you can select one or more documents, regardless of type.
- Automatic classification: When you add the files, Dispatcher will process them and classify them automatically according to their document type (payslips, contracts, certificates, etc.).
A quick and intuitive way to bring documents into the system.
- Procedure: Open a Windows File Explorer window, select the documents you want to add and drag them to the "Originales" window (Originals window) of the Dispatcher module.
- Classification: When you drop them, the documents will be automatically processed and categorized by Ubyquo according to their type.
An advanced option that allows direct integration with your computer's folder system, especially useful for automation.
- Location: This folder is inside Ubyquo's installation path:
...\Quantyca\Ubyquo\Ubyquo Import\ - Shortcut: You can also get there quickly by right-clicking the Ubyquo icon in the taskbar (next to the clock) and selecting the option that opens the
$Ubyquo Dispatcherfolder directly.

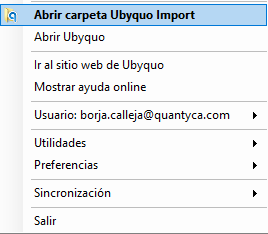
- Structure: Inside you will find a specific folder for each e-mail address configured as a sending profile.
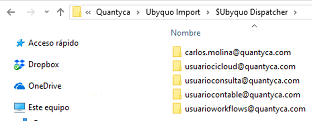
- How it works: You only need to copy the documents into the corresponding folder. Ubyquo does not need to be open; the system automatically detects the files and classifies them.
Automation
If automatic sending of documents has been configured (by e-mail, to a folder or to the Documents module), no additional step is needed after adding the documents.
Otherwise, you will need to run the sending actions manually from the Dispatcher module.
How do I download forms from the AEAT website?
This section explains how to obtain the official forms from the website of the Agencia Tributaria (AEAT, the Spanish Tax Agency), a necessary step for them to be added and automatically classified later in Ubyquo's Dispatcher module.
Download forms from the AEAT website